
How to Color Manga with AI: Reference Images, Prompts & Annotations
A practical guide to AI manga coloring with reference images, clear prompts, local annotations, and sampled colors. Learn how to review and refine your results in MangaFusion.
If you’re coloring manga for your own reading, the colors only need to be good enough to make the page more enjoyable. Fast results, a low cost per page, and the freedom to color a whole chapter without hitting a usage cap can matter more than getting every shade right.
If you’re a creator preparing manga for others to read, it’s worth spending more time on color. Keeping character palettes consistent across panels and using color to draw attention to the action can make the story easier to follow.
This guide draws on our experience coloring manga with MangaFusion. We’ll show how we use reference images, focused prompts, and on-image annotations to guide the first pass and refine the details before sharing the work with readers.
In this guide
- 01 · Define the task
- 02 · Choose references
- 03 · Set the overall style
- 04 · Mark specific changes
- 05 · Sample a color
- 06 · Refine the result
- 07 · Review the details
Coloring a manga page involves more than filling empty spaces. A character’s hair, skin, and clothing need a coherent palette. Shadows need to make sense. Fine linework, lettering, and motion effects still need to read clearly.
AI can help with this process, but a broad instruction such as “make it colorful” leaves many decisions open. A useful way to work is to separate your direction into three parts:
- Reference images: What should it look like? Character colors and visual cues.
- Global prompt: What applies everywhere? Style, lighting, and preservation.
- Local annotations: What changes here? A specific area and a specific request.
Decide what the image needs.
Before writing a prompt, look at what is already in your input. A black-and-white page needs a palette. A flat-colored drawing may only need shading. An existing colored result may need one correction.
| Starting image | Main goal | What to specify |
|---|---|---|
| Black-and-white art | Establish the colors | Hair, skin, clothing, and overall style. |
| Flat-colored art | Add depth and finish | Keep the palette; add shadows and highlights. |
| A colored result | Correct a detail | The exact area to change and what to preserve. |
For a flat-colored input, asking the model to “finish coloring” may leave it free to reinterpret the palette. Describe the intended transformation instead:
Example prompt / Finishing flat colors
Keep the existing hues and color regions.
Add shadows, highlights, and gentle gradients to the current palette.
Preserve the composition, poses, expressions, line art, and text.
Define the scope of the change first. Then describe the finish.
Show the palette you mean.
“Brown hair” and “a blue jacket” cover a wide range of colors. A character sheet or a previously approved colored panel can give the model a more concrete reference.
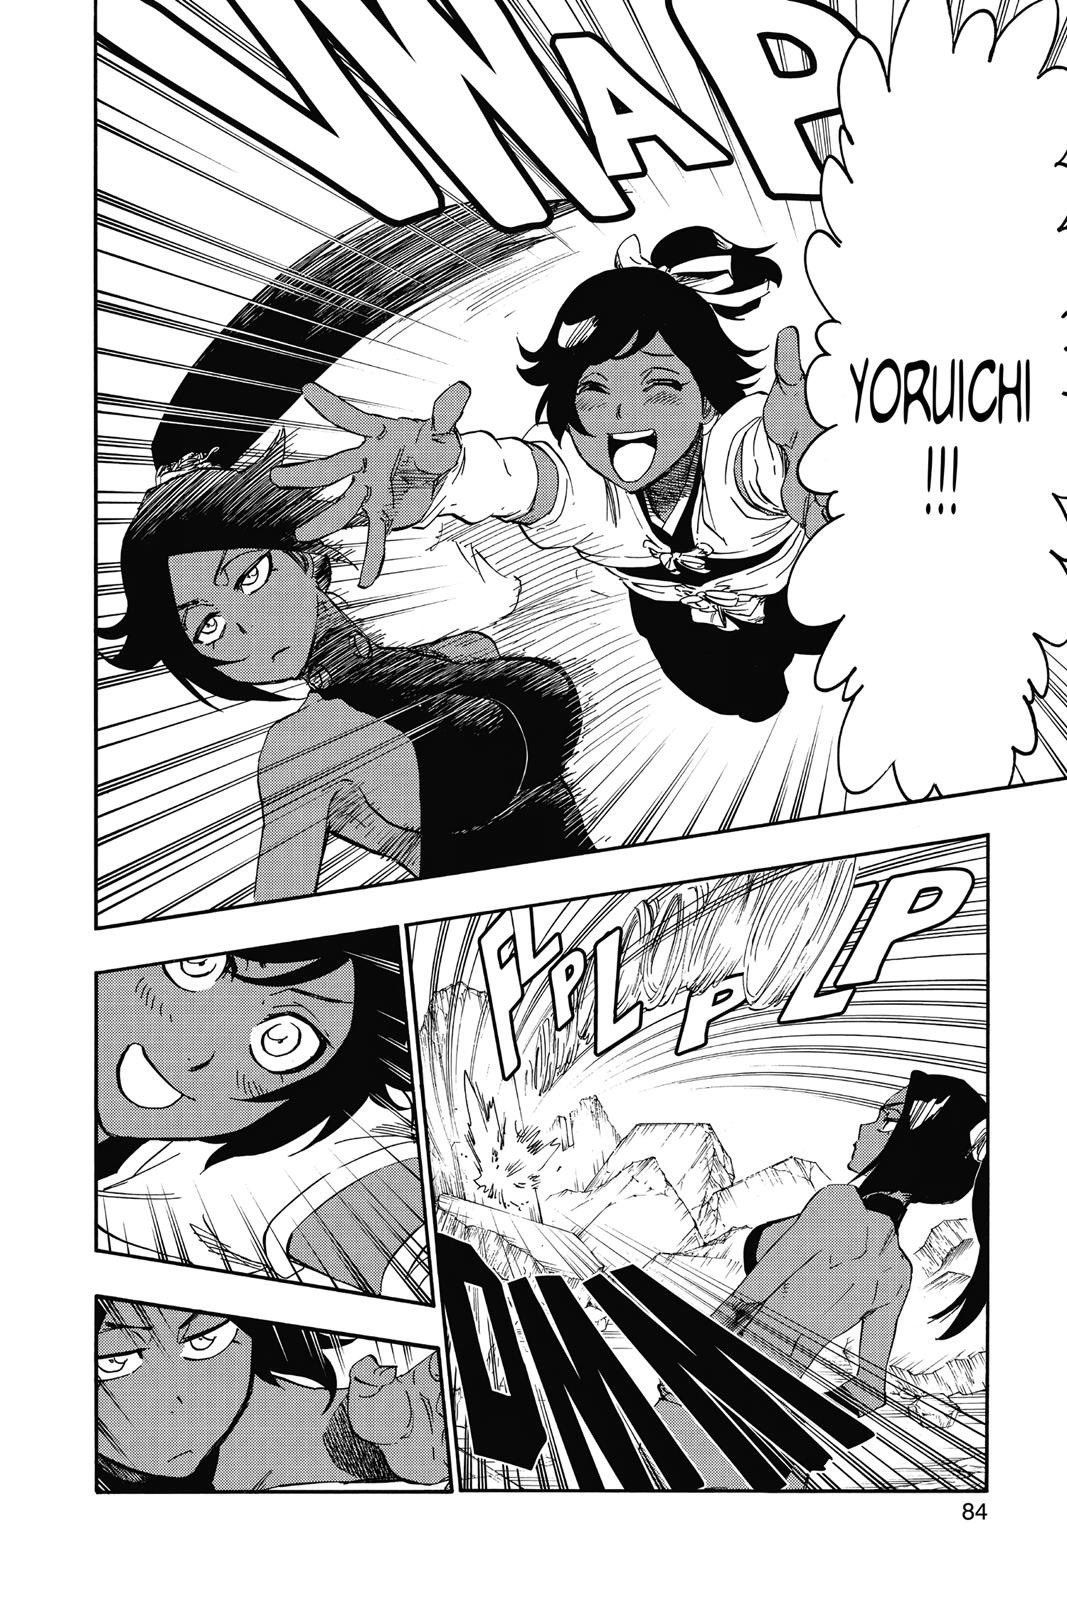
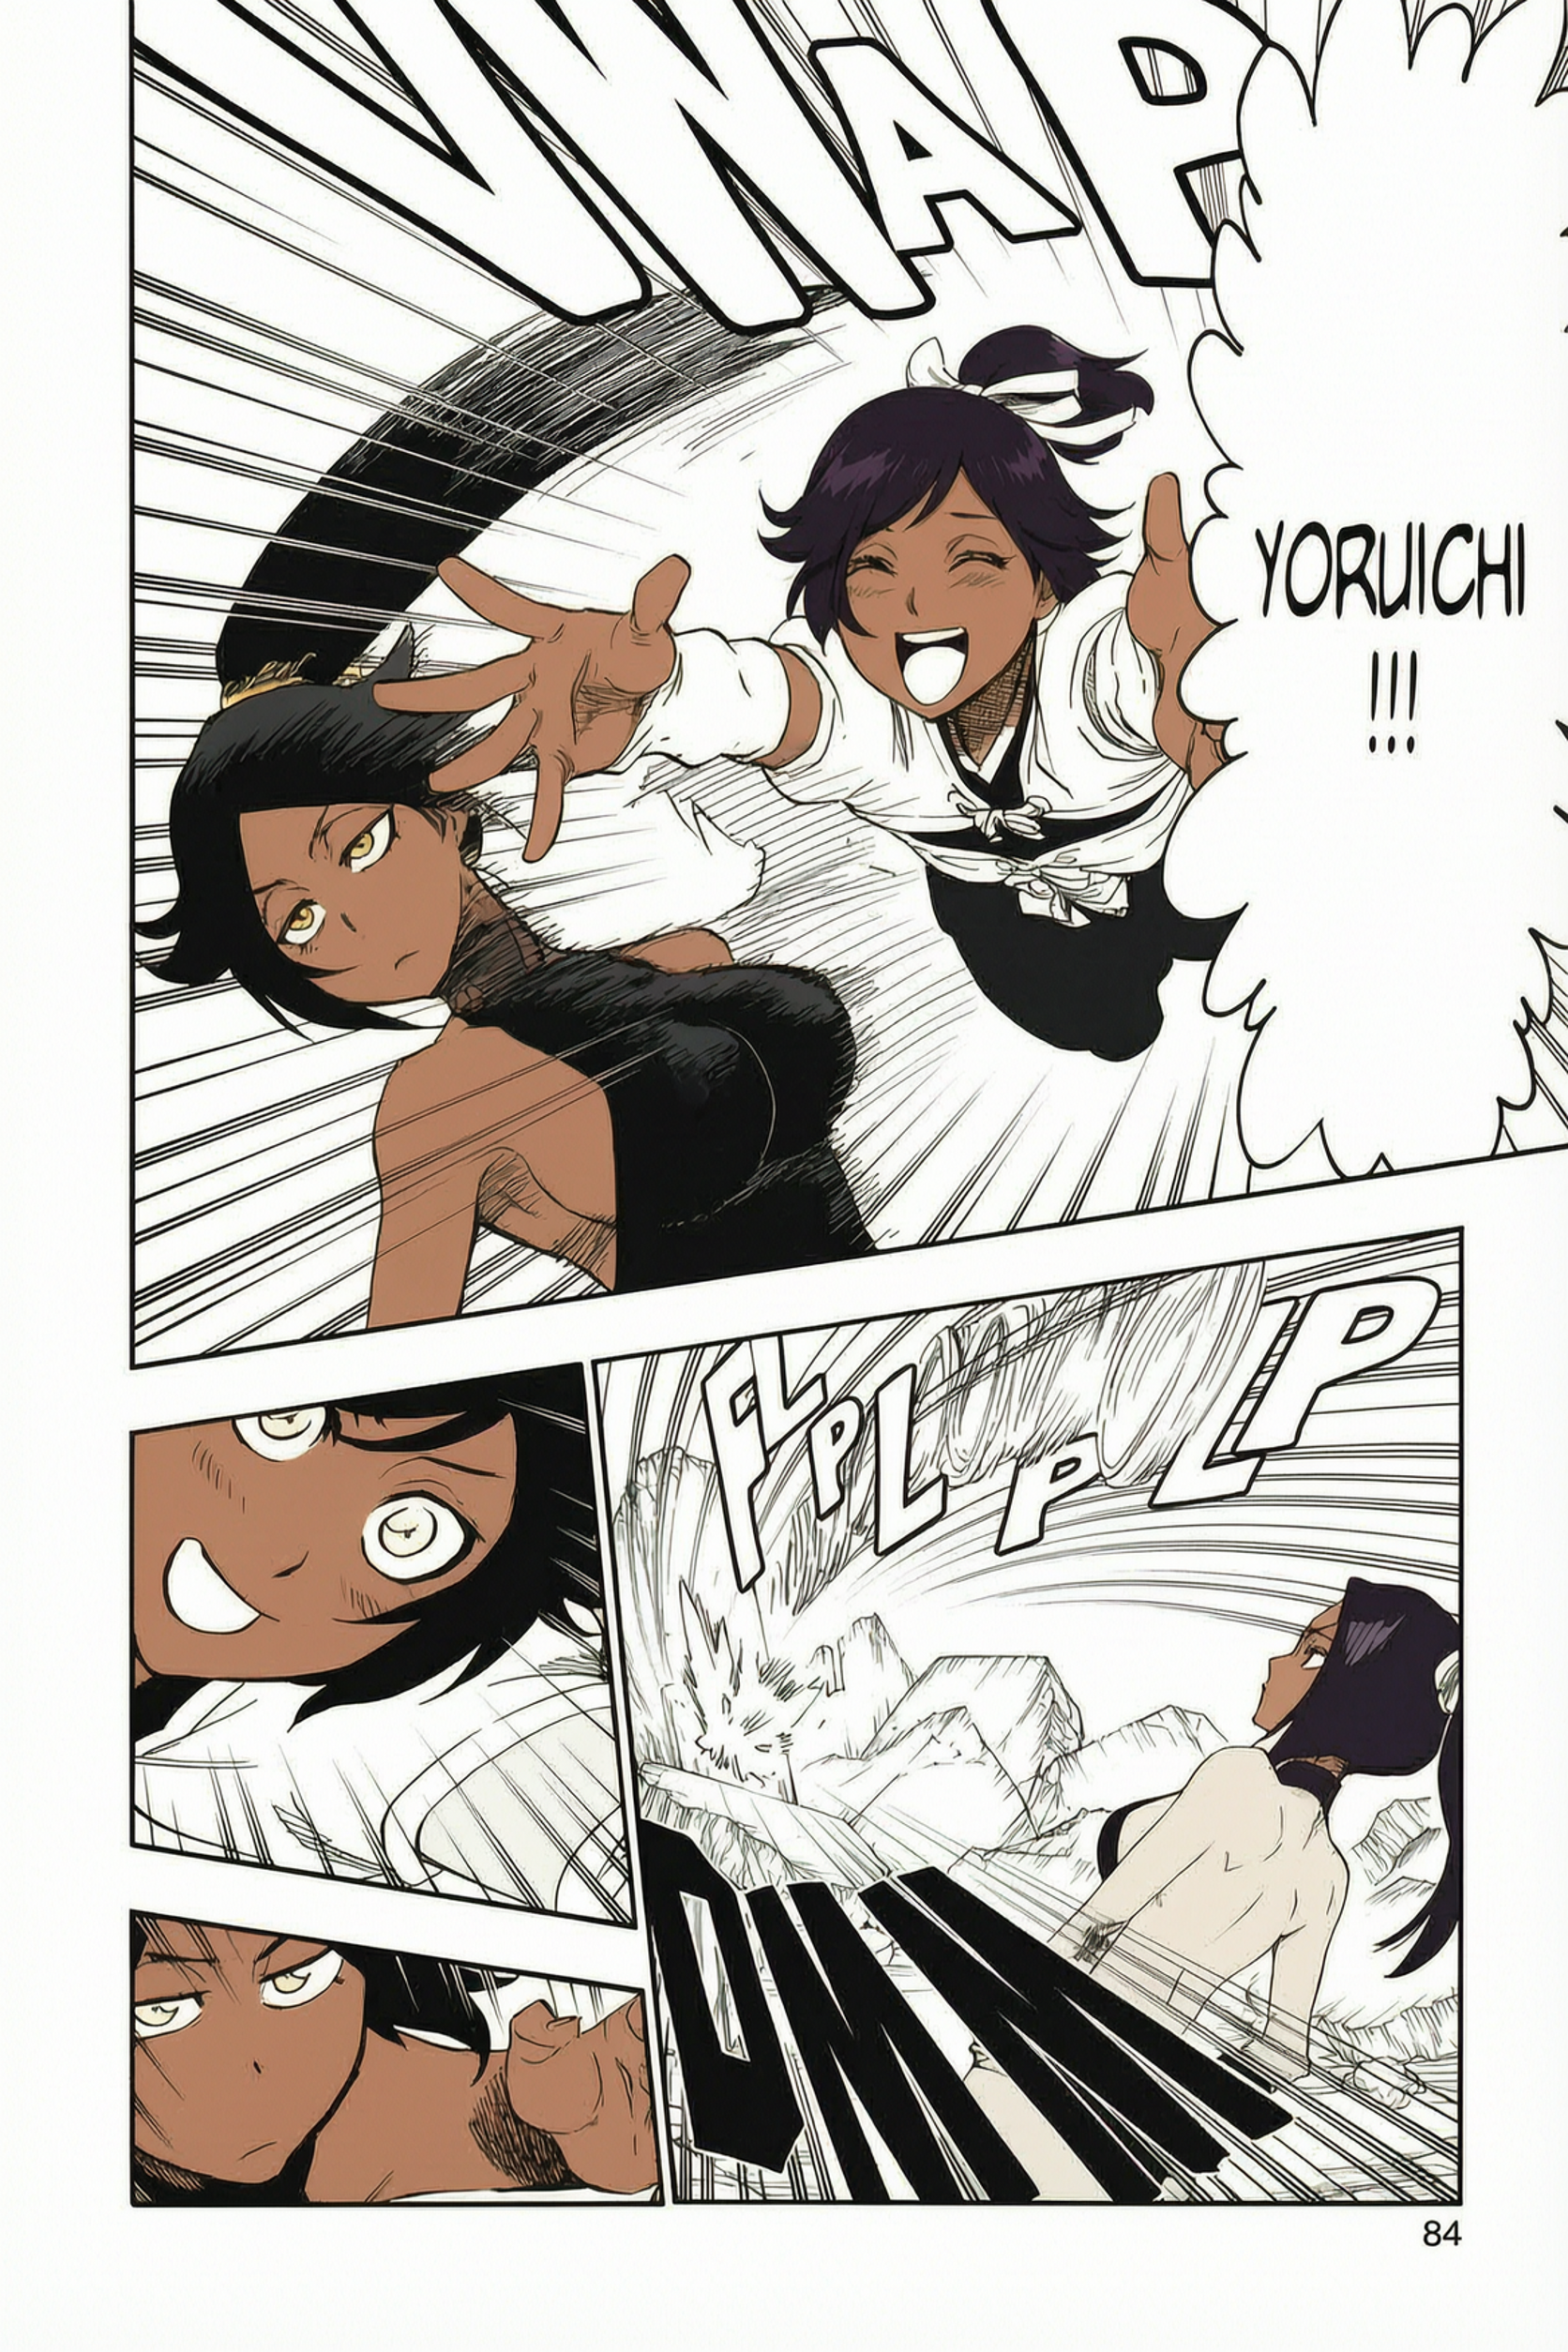
The manga page to colorize is image 1. Uploaded reference images start at image 2, in the order shown in the reference panel.
Choose references where the relevant details are visible. Hair hidden behind a hat is a weak hair-color reference; clothing under a strong colored light may be difficult to interpret as a base color.
- Make the purpose explicit. Say whether the image defines character colors, materials, or the overall mood.
- Resolve conflicting references. If two images use different palettes, explain which one applies to which character or detail.
- Reuse the same palette description. For a multi-page project, keep the character reference and basic color notes consistent.
Example prompt / Reference roles
Color manga image 1 using the following references.

Use reference image 2 for the figure wearing the white blouse:
skin #BE896E, hair #2E2234, eyes #A57438,
black fabric #1F1D20, and white fabric #F6F1EC.

Use reference image 3 for the figure wearing the black outfit:
skin #A4775B, hair #1C121D, eyes #CF9F45,
outfit #1F1F23, and arm wraps #F1E6D7.

Use these as base-color references, allowing natural changes
from lighting. Keep each outfit’s palette consistent across panels.
Preserve the manga page’s composition, poses, expressions,
and line art; do not replace them with the reference poses.
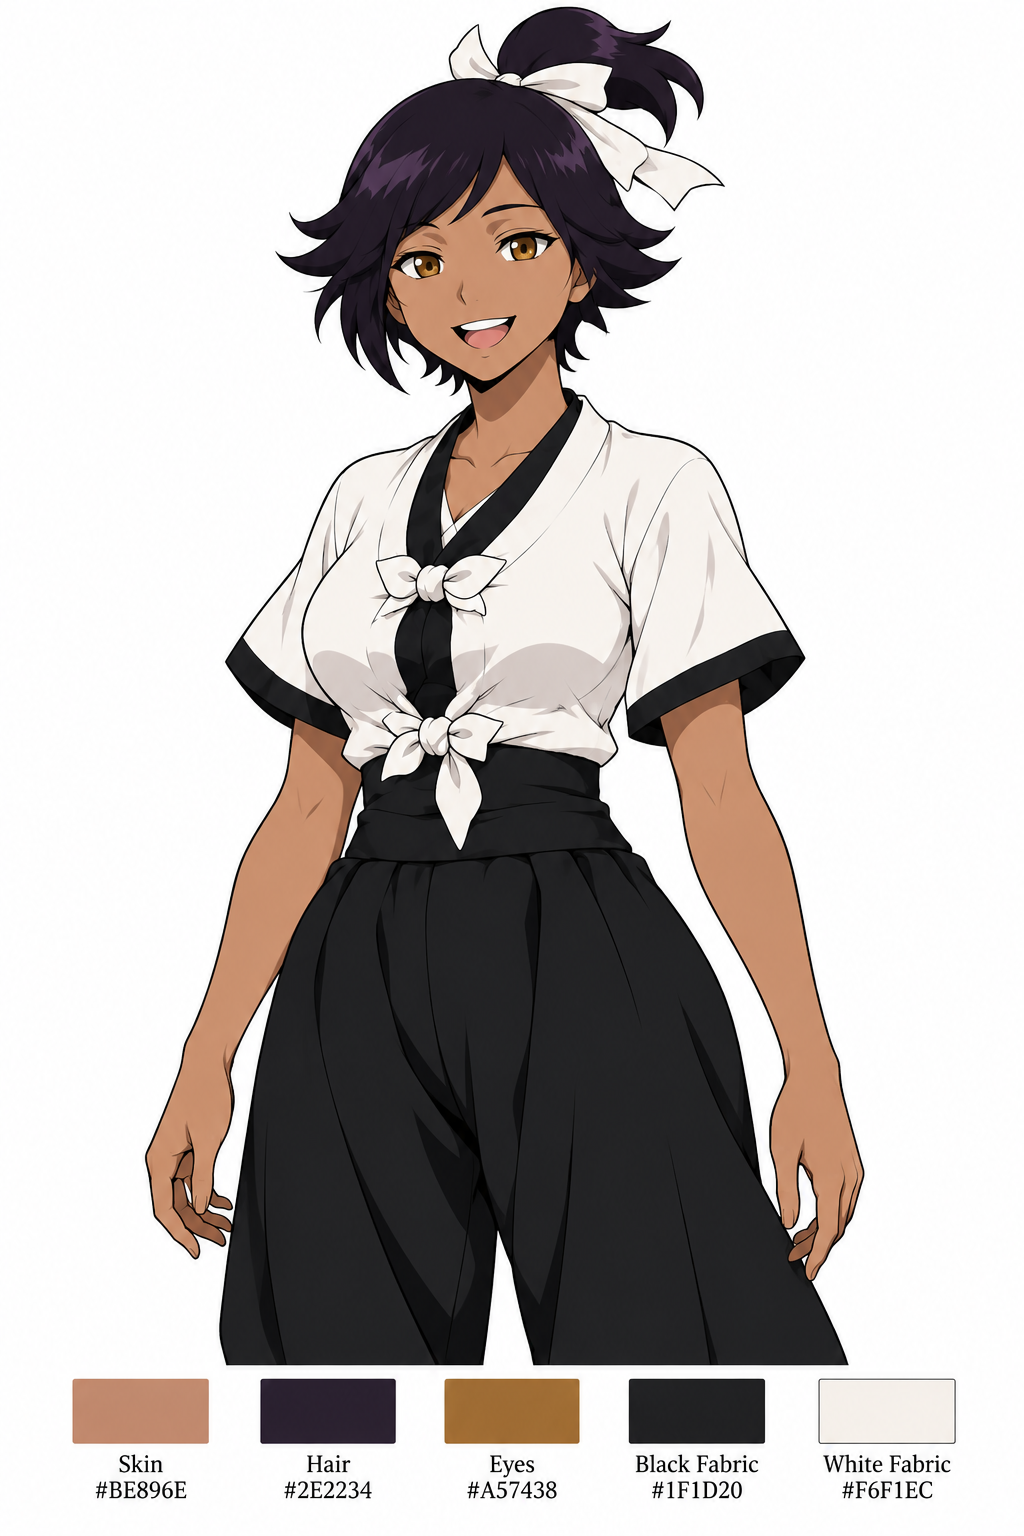
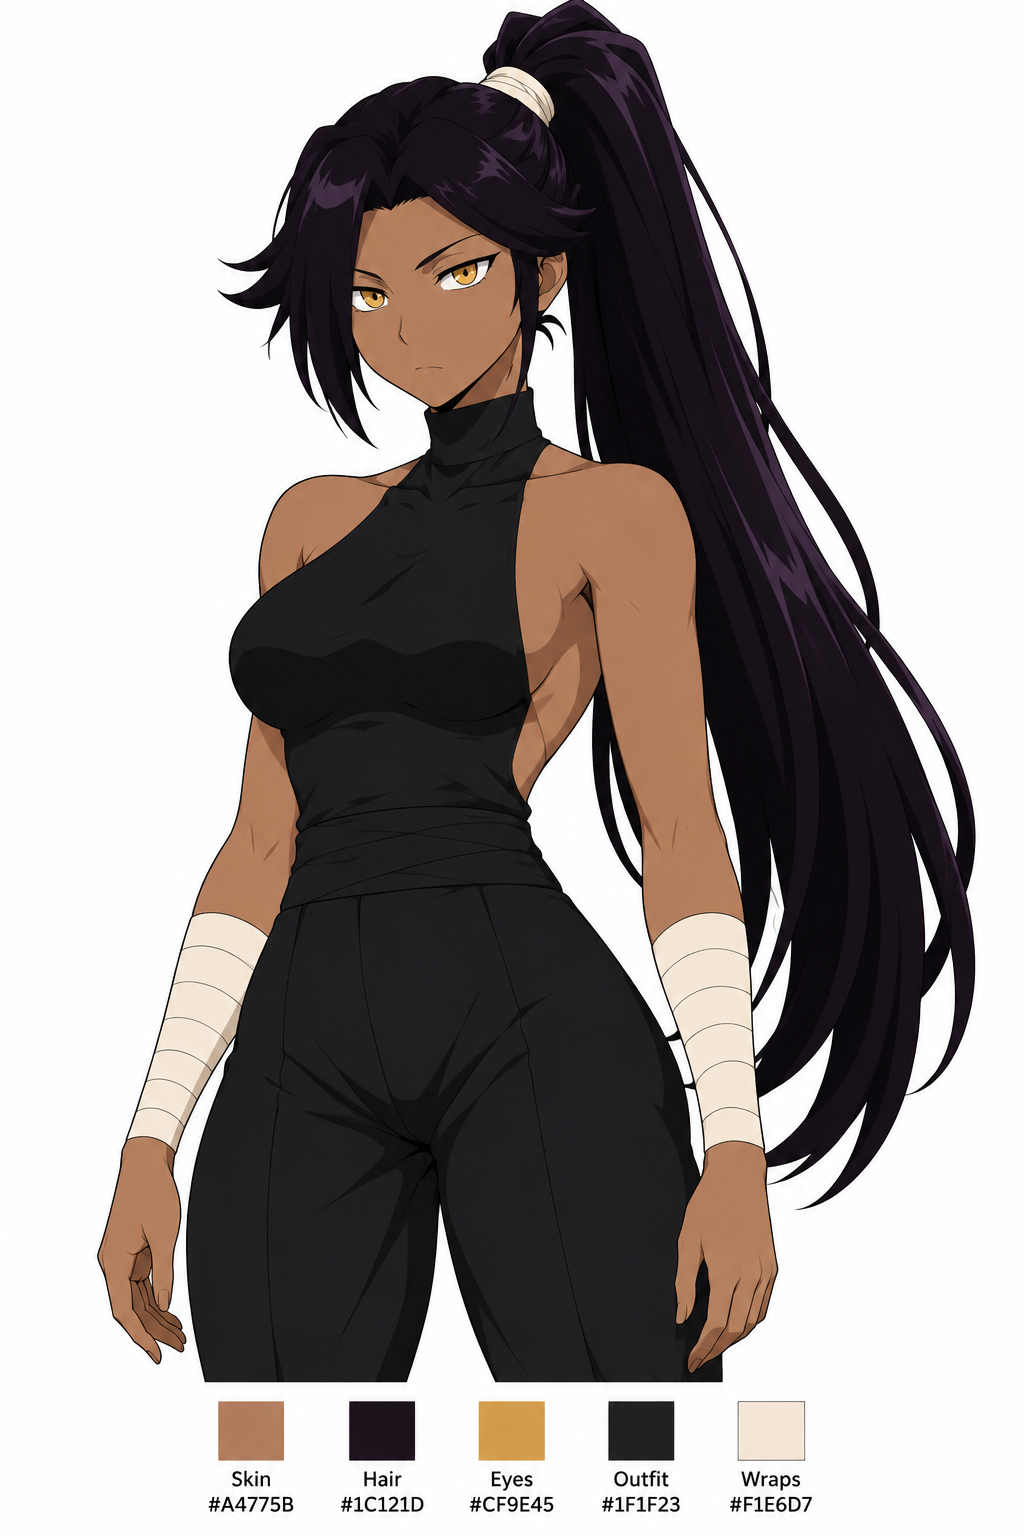
These inputs express a consistency goal; they do not replace checking each output. Small figures, occluded details, and strongly shaded panels deserve particular attention.
Let the global prompt handle the whole page.
Use the main prompt for requirements that apply throughout the image: the coloring style, lighting, background treatment, and elements to preserve.
Starting template / Clean anime coloring
Use a consistent anime coloring style.

Preserve the original composition, poses, expressions,
line art, panel layout, and text.
Keep motion lines, speed lines, and impact lines.
Maintain crisp outlines and clear color boundaries.

Add shadows that follow the shapes of the characters
and objects. Keep the background slightly less saturated
than the main characters.
Preserve black lettering on white speech bubbles.
If your input already has a palette, add: “Keep the existing colors; adjust only the shading and highlights.”
Start with one main style direction. Crisp cel shading and soft gradient shading are different goals; choose the dominant treatment before adding more adjectives.
Separate boundaries from shading. You can ask for sharp outlines and color-region edges while still allowing smooth transitions inside a region, such as a softly shaded cheek.
Mark the area you want to change.
On a page with several characters or panels, “change the jacket on the left” can be ambiguous. A circle or arrow connects a written instruction to a visible location.
Choose a model that can follow detailed visual instructions. Annotation-guided coloring requires the model to interpret marked areas, connect them with written instructions, and apply the requested changes. We recommend Pro or Plus for this workflow. Plus is the recommended choice for the best results, especially when you have several local instructions or detailed color requirements. Max is also available, but its results are more modest for this workflow, so it is not our first recommendation for annotation-guided coloring.
In MangaFusion, choose Annotate first as the coloring mode, add a page, and open Add instructions on its image card. Use a circle, rectangle, freehand mark, arrow, or text note, then enter the corresponding instruction.
- Mark one area you want to describe.
- Write a specific instruction for that mark.
- Add separate marks for details that need different treatment.
- Save the instructions, then review and confirm the coloring submission.
Example / Numbered local instructions
1. Slightly brighten the skin. Use warm shadows
   and preserve the facial linework.

2. Keep the hair dark brown. Add restrained highlights
   that follow the direction of the strands.

3. Make this jacket navy blue. Preserve the fold lines.

4. Keep this lettering, speech bubble, and motion lines
   unchanged.
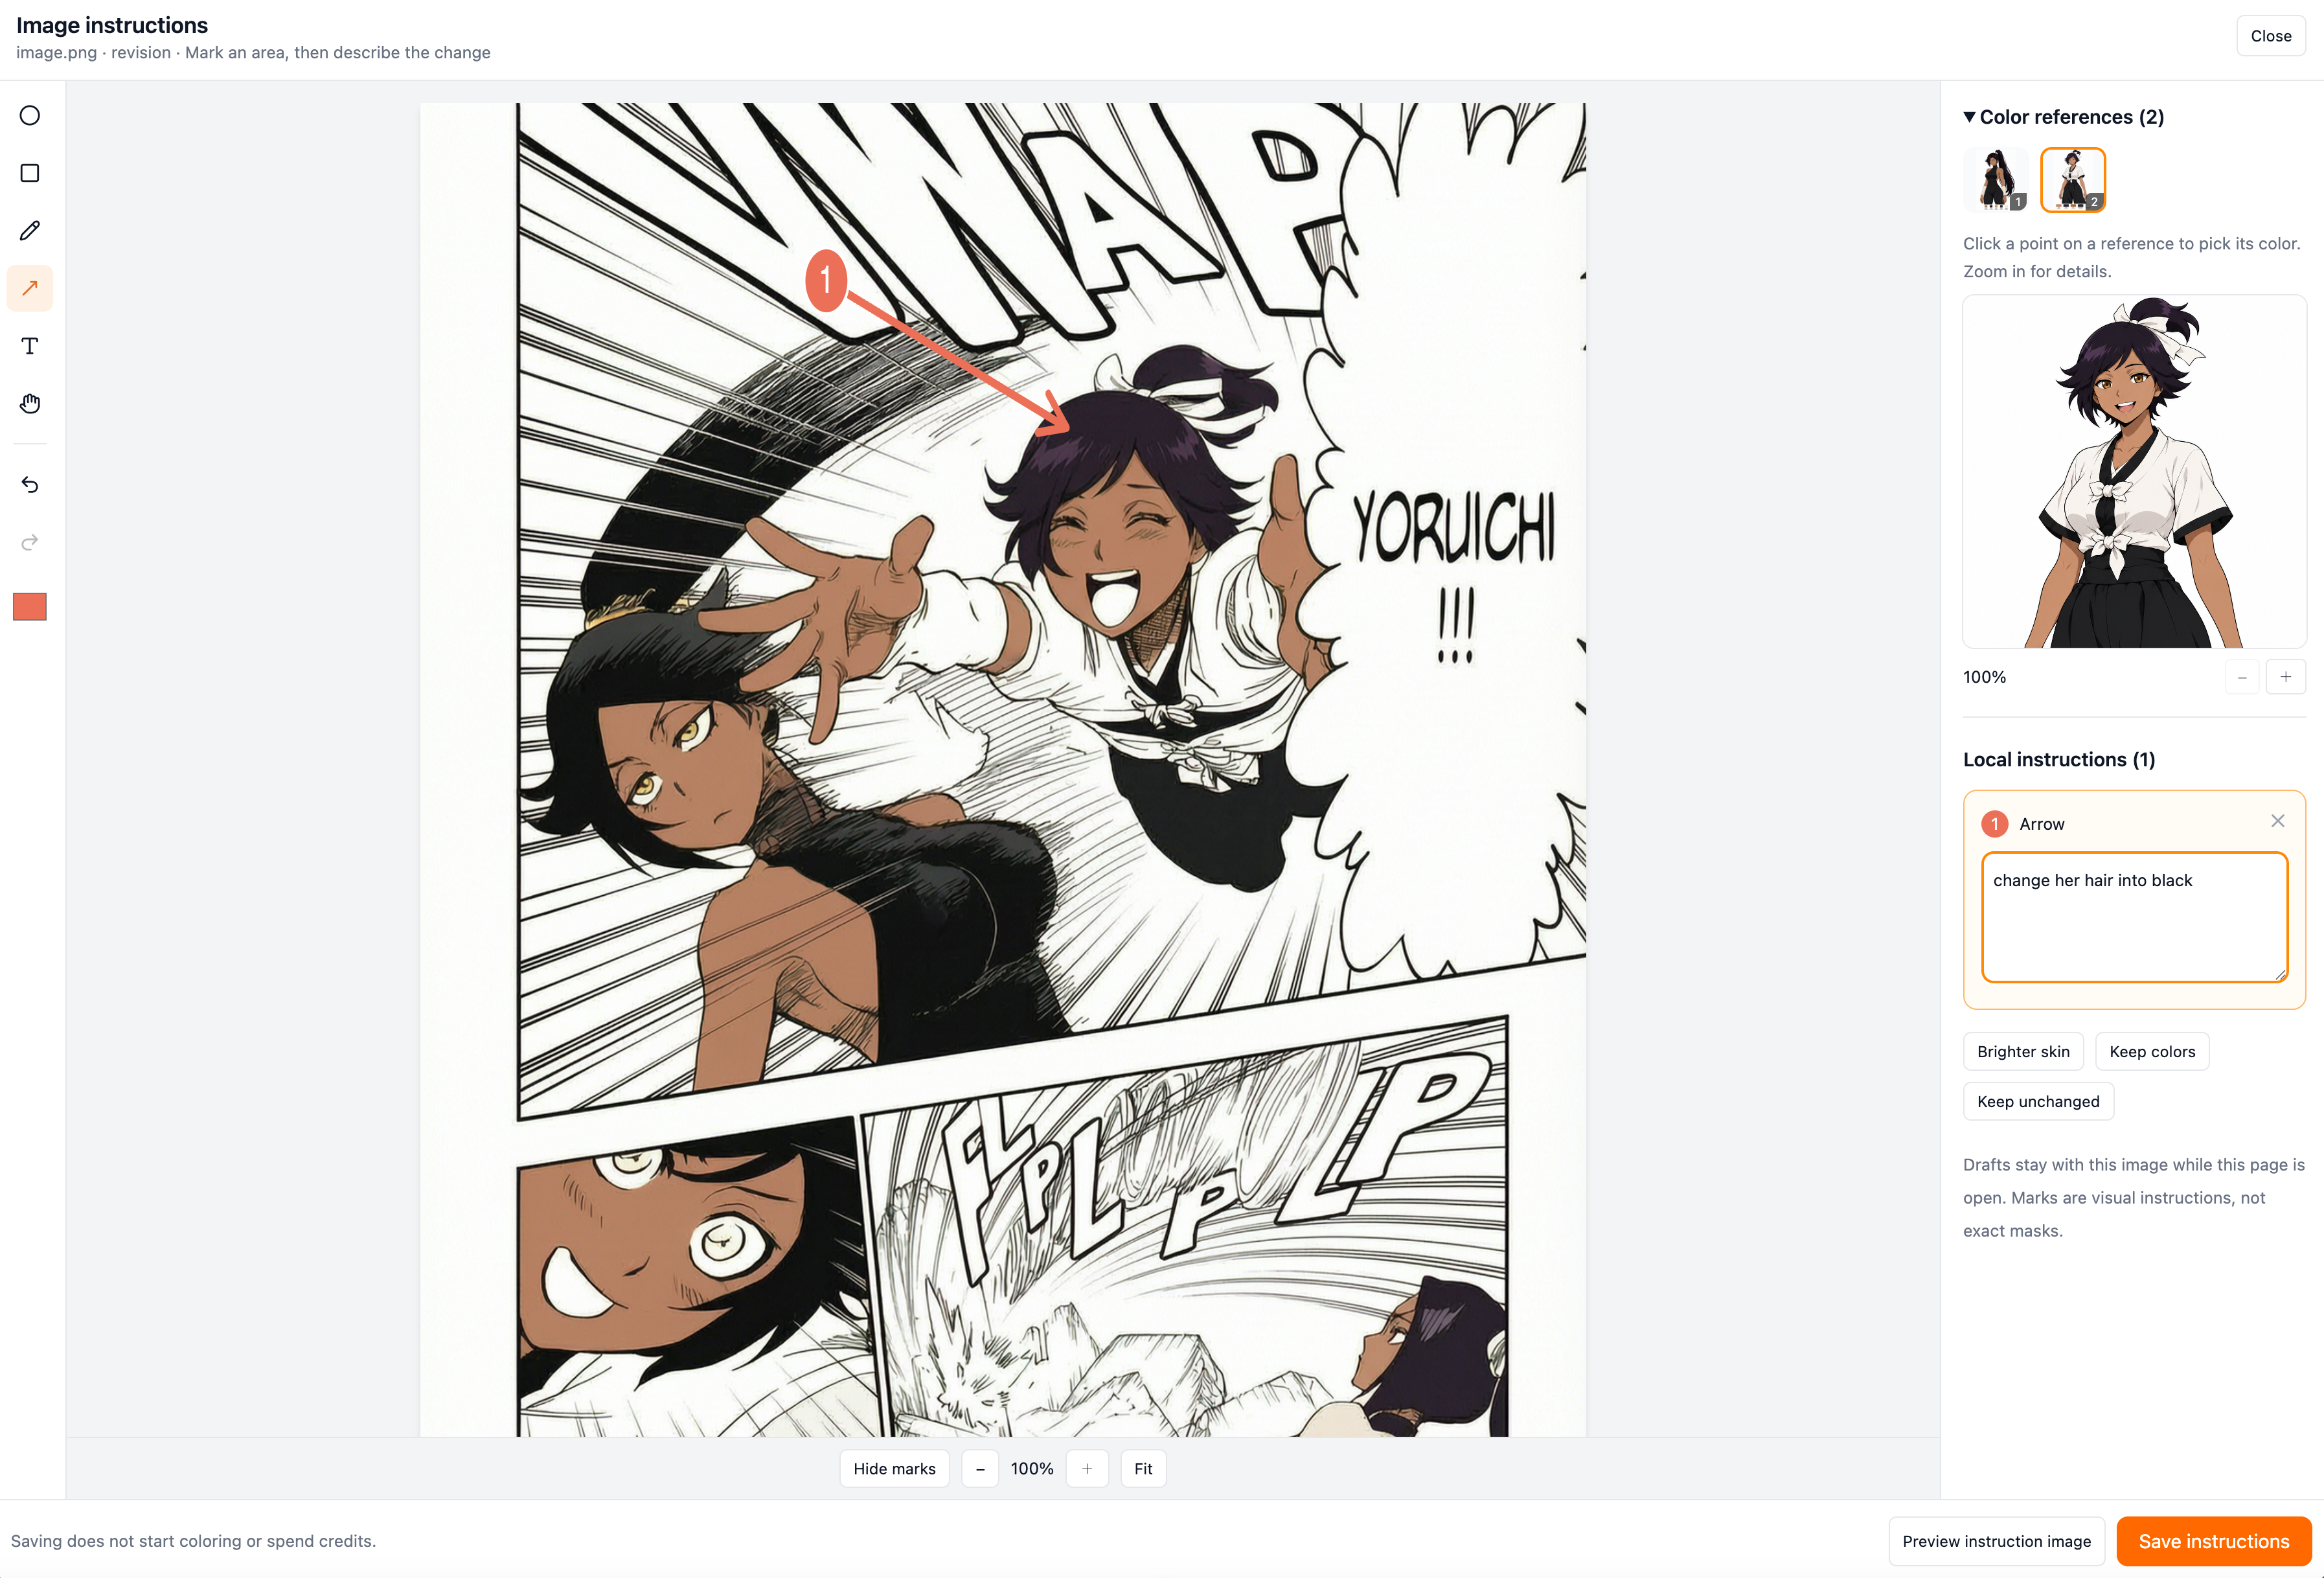
A mark is guidance, not an exact mask. Annotations help communicate location, but they do not guarantee that only the marked pixels will change. Inspect the full result, including areas outside the marks.
Keep each request focused. “Soften the skin highlights” is easier to assess than a single note asking for different skin, hair, clothing, background, and lighting at once.
Sample a reference instead of guessing a name.
When the reference contains the color you want, you can pick it directly inside the annotation editor. Switch between your added references, zoom in for detail, and click a point to read its HEX value.
Select the relevant mark, then add the sampled color to its local instruction. For the marked hair, the resulting request might be:
Example / A sampled hair color
Use #261C29 as the base color for the marked hair.
Preserve its shape and linework. Add restrained highlights
that follow the direction of the strands.
Allow natural brightness changes from the lighting.
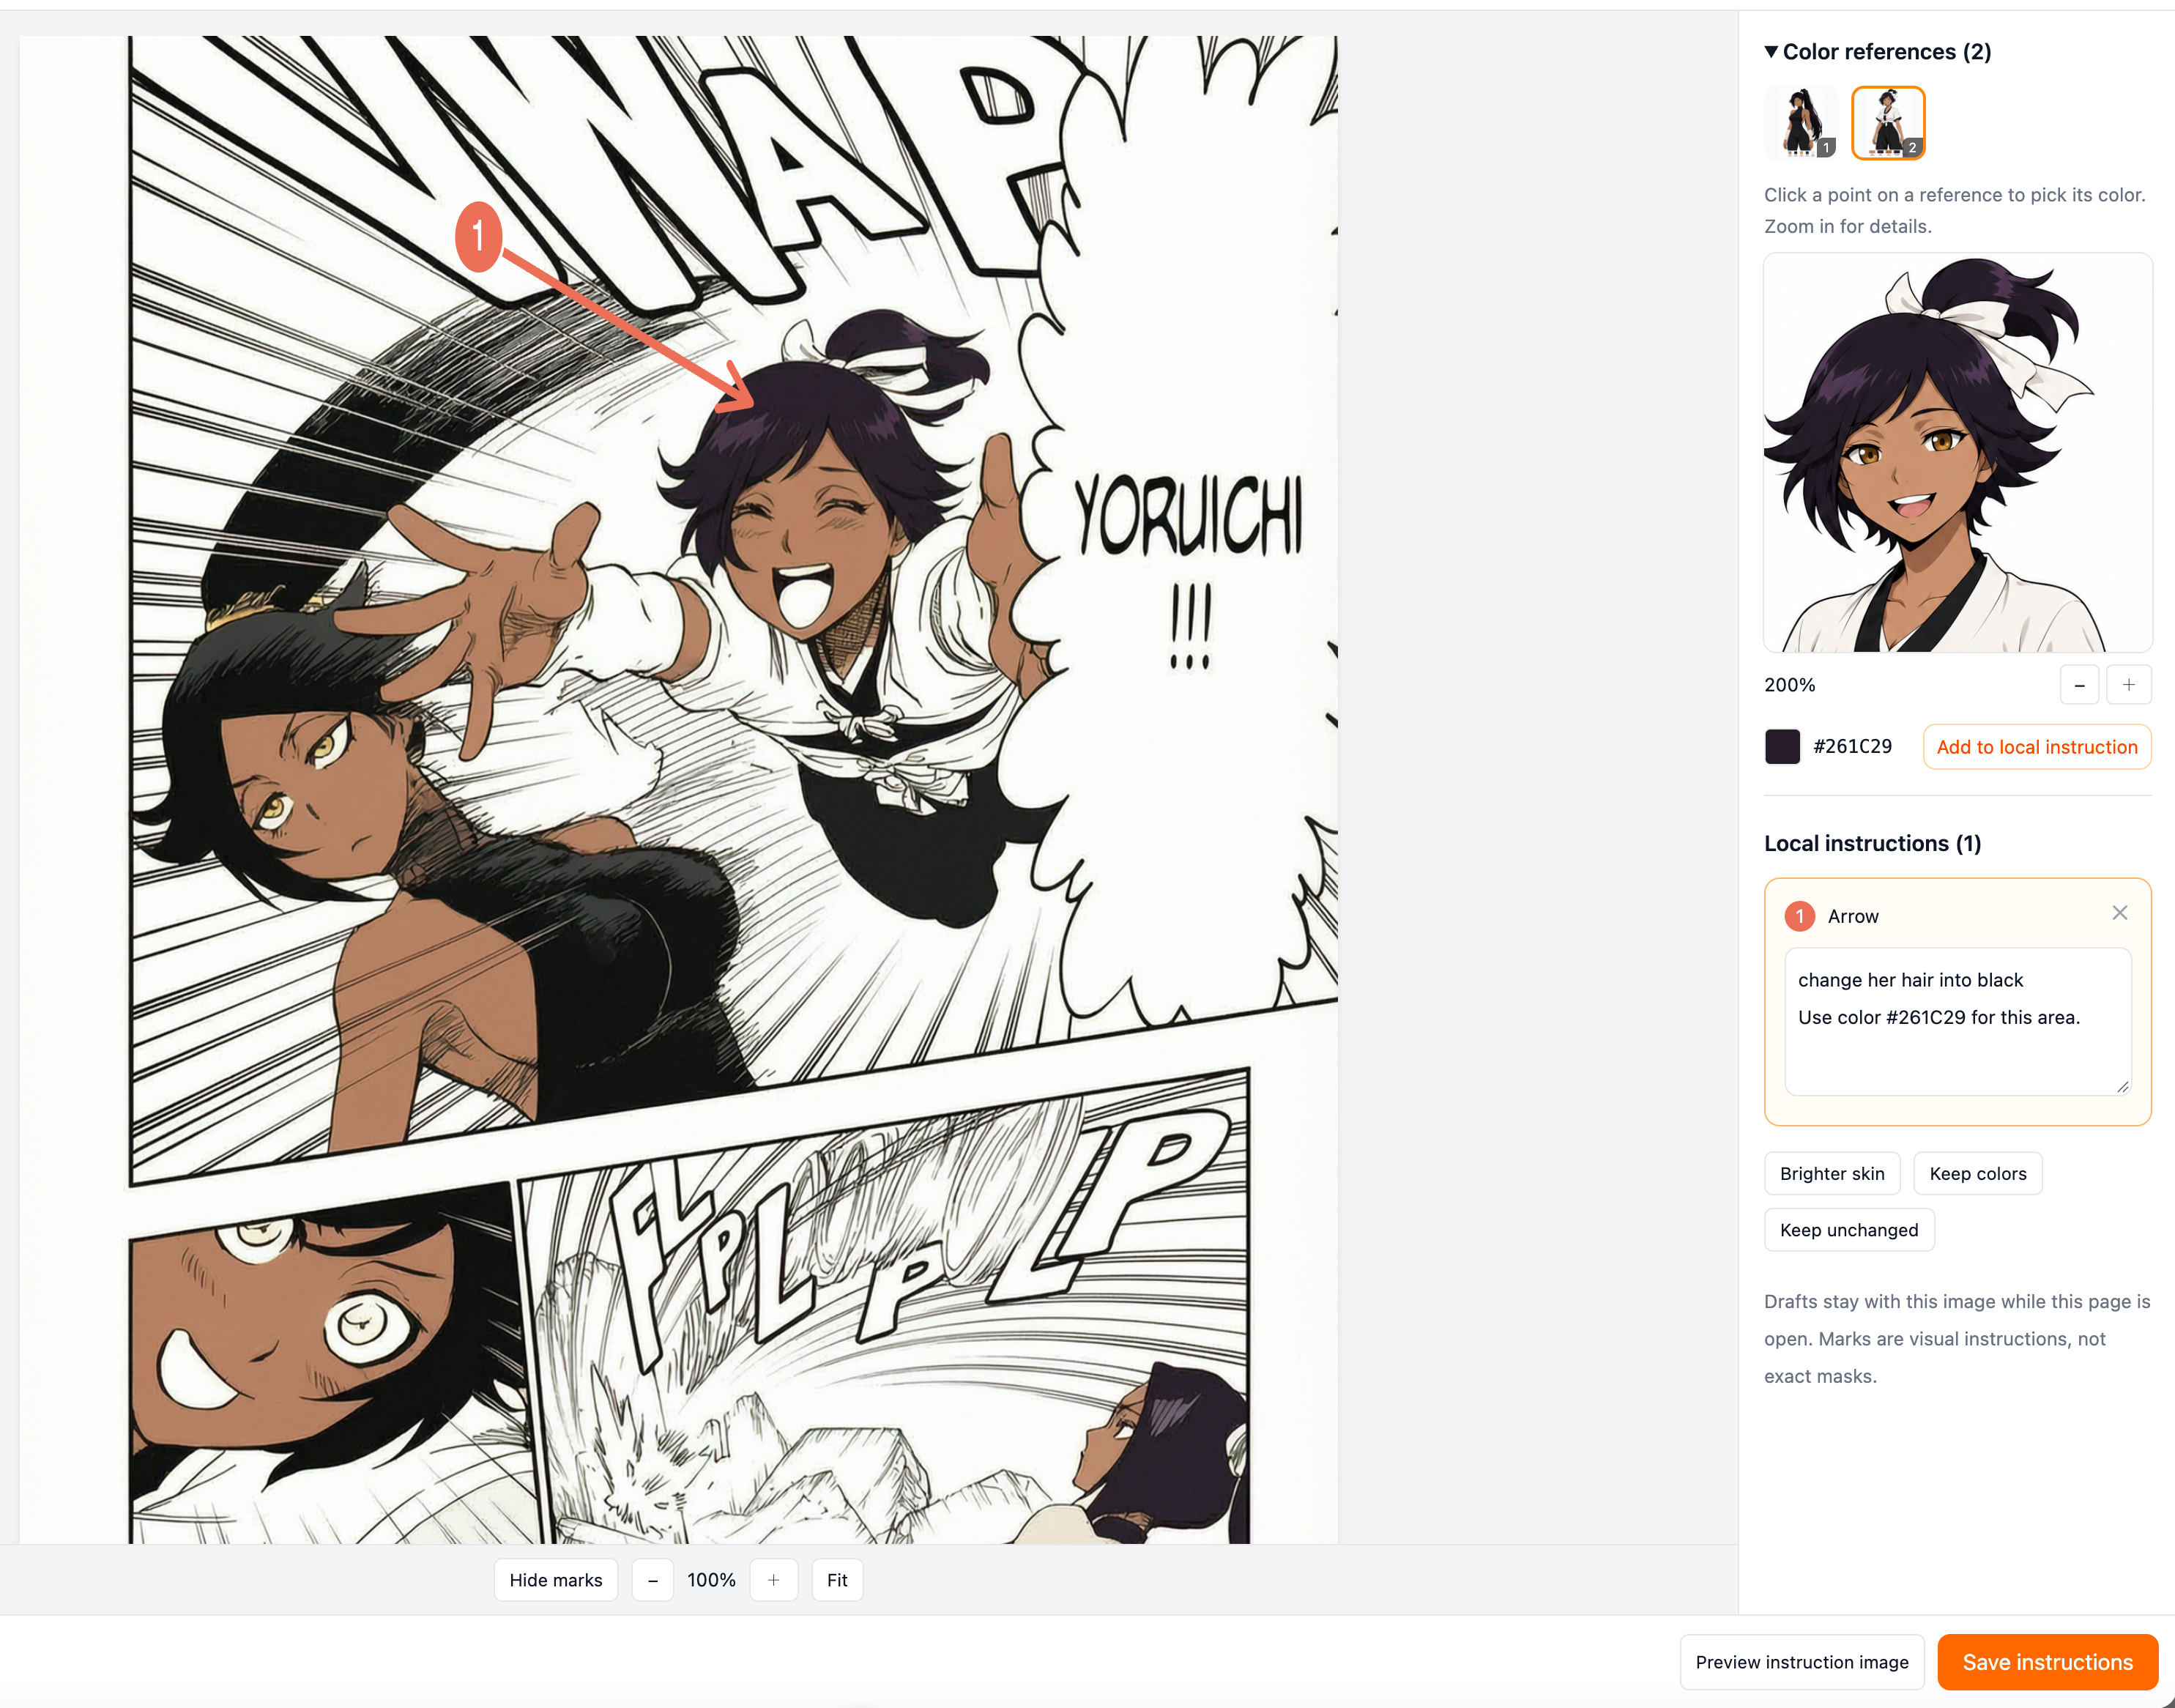
A HEX value is a reference target, not a guarantee that every pixel will match it. Shadows, highlights, and reflected light naturally change a surface’s appearance.
For skin, explain both the palette and the treatment:
Example / Warm skin shading
Use #F2CAB7 as the skin base-color reference.
Make lit areas slightly lighter and use warm colors
for the added shadows. Avoid gray or black skin shading.
Preserve the existing black line art.
That last distinction matters: asking to avoid black shading should not imply removing the black lines around eyes, features, or contours.
Fix the problem at the right level.
After the first result, identify whether the problem affects the whole image or only a detail.
If the entire image feels wrong
Review the global prompt and references. An overly dark page, an unwanted palette, or a different shading style may call for a change to the overall direction.
If only a few areas need work
Annotate those areas on the result. MangaFusion’s Annotate result action creates a new item for revision, keeping the previous result available for comparison.
Example / A focused revision
1. Reduce the brightness and size of these skin highlights.
   Keep the face’s existing shape and linework.

2. Restore this jacket to navy blue so its base color
   matches the jacket in the other panels.
Work on one class of problem per pass when possible: establish the palette, adjust the lighting, then inspect finer details. This gives you a clearer basis for deciding what to keep.
Review more than the thumbnail.
A small preview can hide changes that matter in a finished page. Zoom in and check:
- Linework: eyes, hands, fine hair strands, and clothing folds.
- Lettering: dialogue, speech bubbles, captions, and sound effects.
- Motion effects: speed lines, impact lines, and other drawn effects.
- Color boundaries: edges where skin meets hair or clothing.
- Consistency: the same character’s base colors across panels.
- Materials: highlights and shadows that support the intended surface.
Before processing a full chapter, choose a representative page to establish your references, palette, and style. Reuse that direction for the other pages, then review the outputs individually.
Give every instruction a job. Let references define the palette, the global prompt define the page-wide treatment, and annotations define the local requests. That makes the result easier to review—and the next revision easier to explain.
Try the workflow on one page.
Add a manga page and a character reference, choose Annotate first, and write one specific local instruction. Use the first result to decide what needs the next pass.
Workflow note: saved annotation drafts currently remain available while the page stays open. Complete or record your instructions before refreshing.